Vue3 基础 – Vite & 组件基础
版权归作者 ©刘龙宾 所有,本文章未经作者允许,禁止私自转载!
1. Vite 的基本使用
1.1 浏览器内的模板编译 vs 构建工具
1. 什么是浏览器内的模板编译
浏览器内的模板编译,指的就是把浏览器不识别的代码,编译成浏览器能识别和运行的代码。例如下面的 v-for 指令:
<ul>
  <li v-for="item in todos">
    <span>{{ item.task }}</span>
  </li>
</ul>
浏览器无法正确解析和执行 v-for 指令,因为这是 Vue 框架提供的特殊语法。因此,为了保证浏览器最终能渲染出列表的结构,Vue 必须做以下2件事情:
- 把模板编译成渲染函数
- 执行渲染函数并保证项目的持续运行
图示如下:
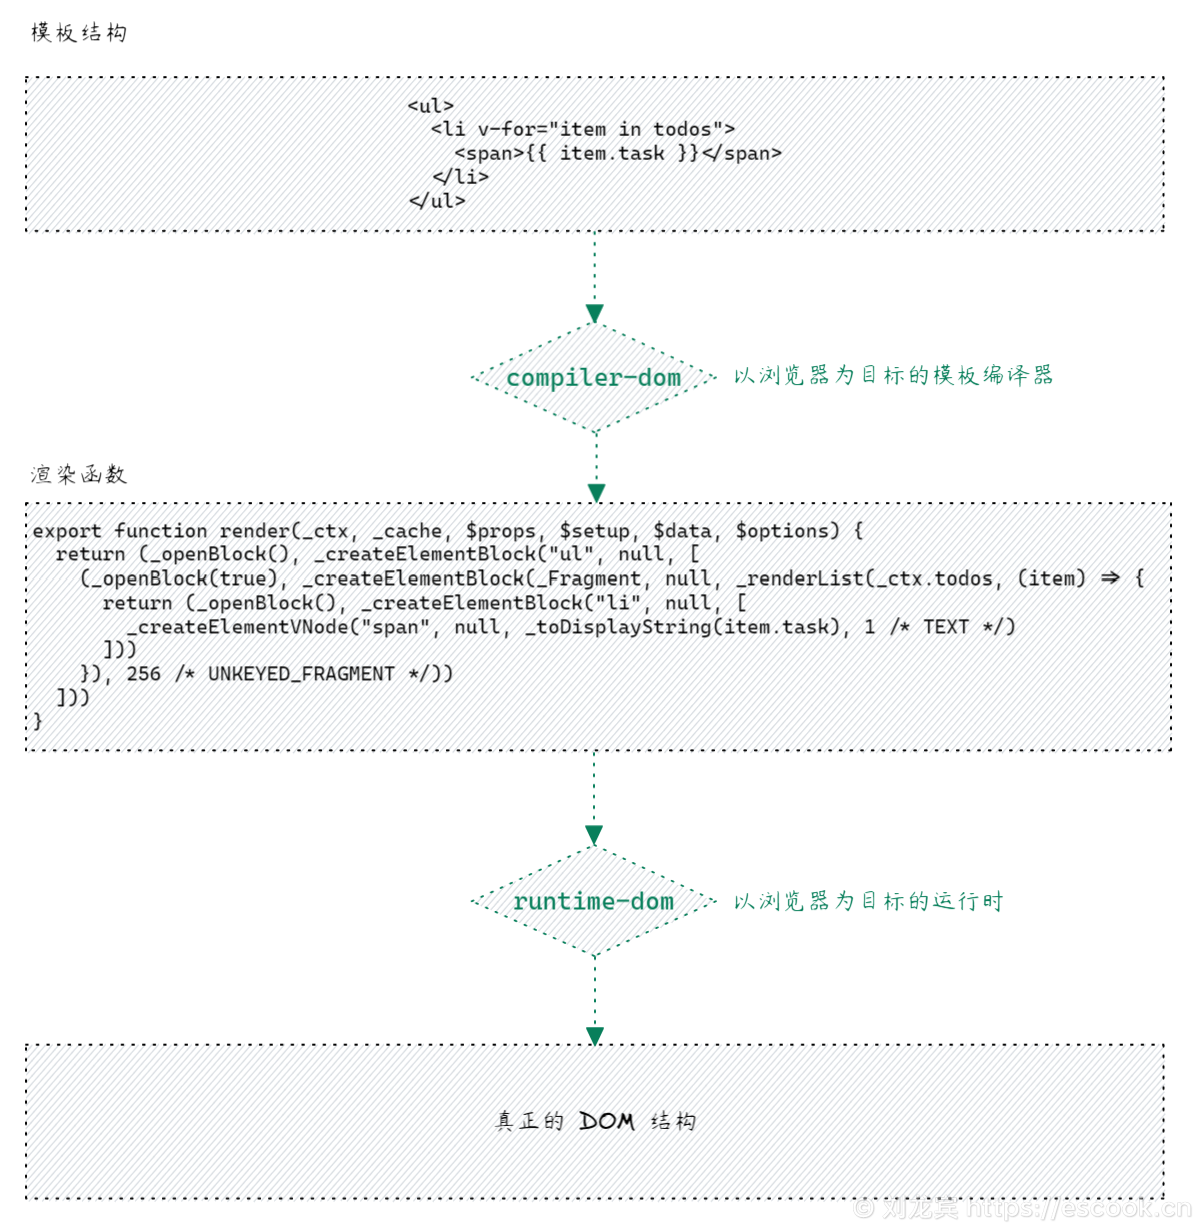
我们之前在浏览器中引入的 vue3.global.vue 就完整的包含了 Compiler 和 Runtime。
也就是说,浏览器在真正调用 Runtime-dom 运行网页之前,必须先调用 compiler-dom 进行模板的编译,这就带来了以下两个问题:
- 如果模板结构比较复杂,则在模板编译阶段会耗费很长的时间,造成用户体验差的问题。
- 导入的 vue.js 体积较大,因为它完整的包含了 Compiler 和 Runtime,导致通过网络加载 vue.js 时比较耗时。
2. 通过构建工具进行预构建
为了解决模板编译耗时问题和导入的 vue.js 包体积大的问题,我们推荐大家通过构建工具对 Vue 项目进行预构建。构建工具的作用如下图所示:
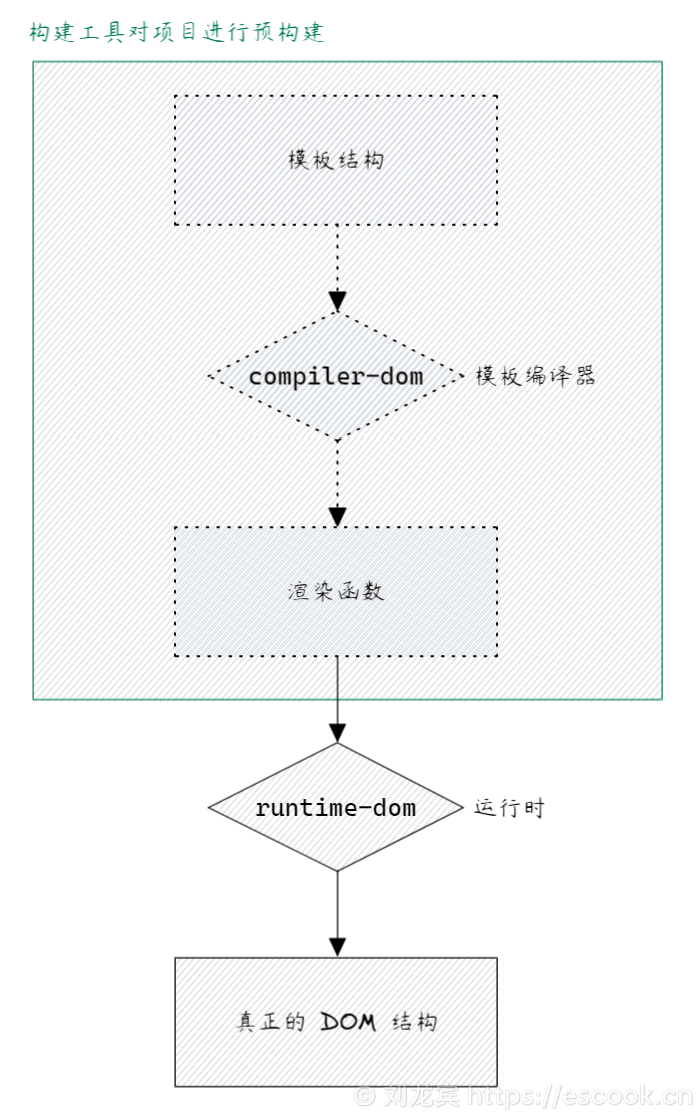
通过预构建,我们可以把模板编译的过程,独立于项目运行之前。这样做的好处有以下两点:
- 节省了项目运行期间的模板编译过程,提高了性能
- 减少了大约 14KB 的 vue.js 包的体积,因为只需要依赖于 Runtime 运行时,不再依赖于 Compiler 编译器
3. 主流的构建工具
目前,市面上主流的构建工具有以下2个:
- webpack
- vite
其中 webpack 是一个老牌的前端工程化的构建工具,功能强大,插件众多,生态完善。支持 Vue,React,Angular 等主流的前端框架。
而 vite 是 Vue 官方团队研发出的前端工程化构建工具,以卓越的构建性能而迅速崛起,同样支持 Vue,React,Angular 等主流的前端框架。
在今后的 Vue3 项目中,我们选择 vite 作为项目的构建工具,主要原因有以下两点:
- 构建速度极快,开发体验好
- Vue 官方出品,和 Vue3 的项目完美契合
参考文档: 为什么选 Vite
1.2 基于 Vite 创建 Vue3 项目
-
打开终端,运行如下的 npm 命令,基于命令行的方式快速创建 vue3 的项目:
npm create vite@latest -
通过对终端进行交互式的操作,选择项目的配置:
Need to install the following packages: create-vite@4.3.2 Ok to proceed? (y) y √ Project name: ... code2 √ Select a framework: » Vue √ Select a variant: » JavaScript -
项目创建完成后,需要分别执行以下3个命令,从而把项目运行起来:
cd code2
npm install
npm run dev
1.3 熟悉项目的目录结构
- 认识根目录下重要的文件和文件夹:
- src ···················· 源代码目录。开发过程中程序员写的所有代码,都要放到 src 目录下。
- index.html ········· 项目主页。当我们把项目运行起来之后,在浏览器中看到的就是这个页面。
- package.json ······ 包管理配置文件。记录了项目的依赖包,还提供了
dev和build两个命令。 - vite.config.js ······· vite 构建时的配置文件。用来对 vite 的运行方式进行个性化的配置。
- 认识 src 目录下的文件和文件夹:
- assets ··············· 静态资源的存放目录。例如图片、CSS、JS插件等都可以放到此目录下。
- components ······ 组件目录。用户自己封装的 .vue 组件可以放在此目录下。
- App.vue ············ 整个项目的根组件。
- main.js ············· Vue 项目运行的入口。
- style.css ············ 项目的全局样式表。
1.4 以 Compiler + Runtime 的方式编写代码
-
在
index.html中,编写模板结构:<div id="app"> <h1>{{ name }}</h1> </div> -
在
src/main.js中,创建app实例,并提供 data 数据如下:import { createApp } from 'vue' const app = createApp({ data() { return { name: 'zs' } } }) app.mount('#app') -
此时,会发现浏览器的终端提示了如下的警告消息:
[Vue warn]: Component provided template option but runtime compilation is not supported in this build of Vue. Configure your bundler to alias "vue" to "vue/dist/vue.esm-bundler.js".
 at
意思是:步骤2中第1行导入的
vue,只包含 Runtime 运行时,不包含 Compiler 编译器,所以无法在浏览器中编译步骤1中的模板结构。为了能够支持浏览器内的模板编译,请把导入的vue替换为vue/dist/vue.esm-bundler.js。 -
清楚了问题所在之后,我们把
src/main.js中导入 vue 的代码进行修改:import { createApp } from 'vue/dist/vue.esm-bundler.js'保存之后,我们发现项目可以正常的运行了。但是,这种运行 vue 项目的方式并没有把构建工具的作用体现出来:
- 构建工具负责编译模板结构,产出编译好的代码
- 浏览器只需要 Vue 的 Runtime 运行时,即可把编译好的代码直接运行起来
这样做的好处是:
- 减少了 vue.js 的体积,缩短了依赖包的加载时长
- 免去了浏览器内的模板编译过程,提高了项目的运行性能
1.5 以 Runtime 的方式编写代码
Vue 建议我们把模板和数据,全部封装到 .vue 文件中。这样可以充分发挥构建工具的作用,对整个项目中的 .vue 文件进行预构建(模板编译)。当我们在运行项目的时候,只需要导入 Runtime 版本的 vue.js 即可。
一个 .vue 文件的基本结构如下:
<!-- 结构 -->
<template></template>

<!-- 行为 -->
<script></script>

<!-- 样式 -->
<style></style>
所以,我们可以把 1.4 小节中的功能,封装到 src/App.vue 中,具体代码如下:
<!-- 模板结构 -->
<template>
  <h1>{{ name }}</h1>
</template>

<!-- 行为 -->
<script>
import { ref } from 'vue'

export default {
  // setup 函数是响应式 API 的入口
  setup() {
    // 定义响应式数据
    const name = ref('liulongbin')

    // 把数据暴露给模板使用
    return {
      name
    }
  }
}
</script>

<!-- 样式 -->
<style>
h1 {
  color: red;
}
</style>
最后,需要修改 src/main.js 中的代码如下:
// 1. 导入只包含 Runtime 运行时的 vue
import { createApp } from 'vue'
// 2. 导入要渲染到页面上的 .vue 文件(组件)
import App from './App.vue'

// 3. 调用 createApp() 函数,并指定要渲染“组件”
const app = createApp(App)

// 4. 指定挂载的区域
app.mount('#app')
2. Vue 组件的基本使用
2.1 组件的概念
1. 什么是组件
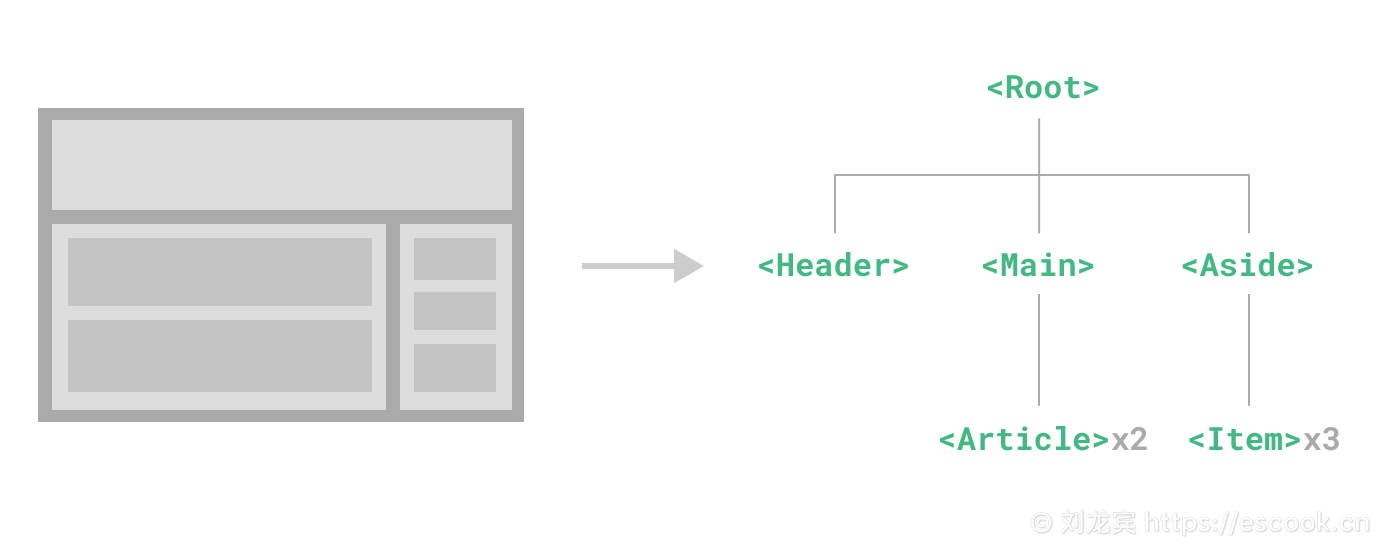
组件是对 UI 结构的封装和复用。在实际应用中,组件常常被组织成层层嵌套的树状结构:
在 Vue 项目中,组件通常被定义为以 .vue 结尾的文件。我们可以在 .vue 组件内封装自定义的内容与逻辑。
2. 定义一个组件
当使用 vite 等构建工具时,我们通常会把组件定义在一个单独的 .vue 文件中,这被叫做单文件组件(Single File Component,简称为:SFC)。例如,下面的代码定义了名为 ButtonCounter.vue 的组件:
<!-- 模板结构 -->
<template>
  <h2>当前的 count 值为:{{ count }}</h2>
  <button @click="add">+1</button>
</template>

<!-- 行为逻辑 -->
<script>
import { ref } from 'vue'

export default {
  setup() {
    // 响应式数据
    const count = ref(0)
    // 方法事件处理器
    const add = () => count.value++

    return {
      count,
      add
    }
  }
}
</script>
3. 使用组件
假设我们要在 App.vue 组件中,使用刚才定义的 ButtonCounter.vue 组件,我们可以在 App.vue 中使用 import 导入 ButtonCounter 组件:
import ButtonCounter from './components/ButtonCounter.vue'然后,在 components 节点下注册组件:
export default {
  setup() { /* 省略其它代码 */ },
  components: {
    ButtonCounter
  }
}
最后,在模板结构中以标签的形式,使用刚才注册的 ButtonCounter 组件:
<!-- 结构 -->
<template>
  <h1>{{ name }}</h1>
  <hr />
  <!-- 使用 ButtonCounter 组件 -->
  <ButtonCounter></ButtonCounter>
</template>
4. 组件之间的关系
组件之间的关系分为:
- 父子关系(例如:根组件 App 和 Header 组件属于父子关系)
- 兄弟关系(例如:Header 组件和 Main 组件属于兄弟关系)
- 后代关系(例如:根组件 App 和 Article 组件属于后代关系)
注意:有直接嵌套关系的,属于父子关系;若是间接的嵌套关系,则属于后代关系。
5. script setup 语法糖
在 SFC 中,为了简化 setup 入口函数的代码,Vue 推荐使用 script setup 语法糖,它的格式如下:
<template></template>

<script setup></script>

<style></style>
例如,使用 script setup 语法糖把 ButtonCounter.vue 组件改造如下:
<template>
  <h1>当前的 count 值为:{{ count }}</h1>
  <button @click="add">+1</button>
</template>

<script setup>
import { ref } from 'vue'
// 顶层变量,方法等都可以在模板中被访问到
const count = ref(0)
const add = () => count.value++
</script>

<style></style>
同时,在 App.vue 组件中使用 ButtonCounter.vue 组件时,可以改造成 script setup 的写法:
<!-- 结构 -->
<template>
  <h1>{{ name }}</h1>
  <hr />
  <!-- 使用 ButtonCounter 组件 -->
  <ButtonCounter></ButtonCounter>
</template>

<script setup>
  import { ref } from 'vue'
  // 顶层变量,都可以在模板中直接使用
  import ButtonCounter from './components/ButtonCounter.vue'
  const name = ref('liulongbin')
</script>
2.2 混合使用选项式 API 和组合式 API
1. 普通 script + setup 入口函数
<template>
  <h2>当前的 count 值为:{{ count }}</h2>
  <button @click="add">+1</button>
</template>

<script>
import { ref } from 'vue'

export default {
  // 其它选项式 API
  name: 'BtnCount',
  // 组合式 API 的入口
  setup() {
    const count = ref(0)
    const add = () => count.value++

    return {
      count,
      add
    }
  }
}
</script>
2. 普通 script + script setup
<template>
  <h2>当前的 count 值为:{{ count }}</h2>
  <button @click="add">+1</button>
</template>

<script setup>
import { ref } from 'vue'
const count = ref(0)
const add = () => count.value++
</script>

<script>
export default {
  name: 'BtnCount'
}
</script>
3. script setup + defineOptions 宏函数
<template>
  <h2>当前的 count 值为:{{ count }}</h2>
  <button @click="add">+1</button>
</template>

<script setup>
// 宏函数,不需要导入就能直接使用
// Vue 在编译阶段,会把 defineOptions 中的配置,编译为选项式 API
defineOptions({
  name: 'BtnCount'
})

import { ref } from 'vue'
const count = ref(0)
const add = () => count.value++
</script>
2.3 SFC 中的样式
1. 样式冲突问题
默认情况下,在组件中声明的 <style> 属于全局样式,这些样式除了会影响组件自身的元素,还会影响到其它组件中的元素。因为这些组件经过 Vue 编译之后,都会被呈现在 index.html 页面中,所以很容易出现样式冲突的问题。
例如 App.vue 组件中给 h1 标签定义的样式,会影响到 Son.vue 组件中的 h1。相应的,在 Son.vue 组件中为 h1 标签定义的样式,也会影响到 App.vue 组件中的 h1。
App.vue 组件中的代码如下:
<!-- 结构 -->
<template>
  <h1>这是 App 根组件中的标题</h1>

  <hr />
  <Son></Son>
</template>

<!-- 行为 -->
<script setup>
import Son from './components/Son.vue'
</script>

<!-- 样式 -->
<style>
h1 {
  color: red;
}
</style>
Son.vue 组件中的样式如下:
<template>
  <h1>这是 Son 子组件中的标题</h1>
  <p>这是 Son 子组件中的段落</p>
</template>

<style>
h1 {
  font-size: 16px;
}
</style>
2. 解决样式冲突
解决样式冲突的方式有很多种,在这里,我们使用自定义属性 + 属性选择器的方式来解决组件之间样式冲突的问题。实现思路如下:
- 为每个 SFC 组件指定唯一的自定义属性名
- 把自定义的属性名,添加给当前组件的每一个元素
- 给当前组件的样式选择器,添加一个交集的属性选择器
例如,给 App.vue 指定一个自定义属性 data-v-001,则把 App.vue 中的模板结构和样式修改如下:
<!-- 结构 -->
<template>
  <h1 data-v-001>这是 App 根组件中的标题</h1>

  <hr data-v-001 />
  <Son></Son>
</template>

<!-- 行为 -->
<script setup>
import Son from './components/Son.vue'
</script>

<!-- 样式 -->
<style>
h1[data-v-001] {
  color: red;
}
</style>
给 Son.vue 指定一个自定义属性 data-v-002,则把 Son.vue 中的模板结构和样式修改如下:
<template>
  <h1 data-v-002>这是 Son 子组件中的标题</h1>
  <p data-v-002>这是 Son 子组件中的段落</p>
</template>

<style>
h1[data-v-002] {
  font-size: 16px;
}
</style>
这样,就成功的解决了组件之间的样式冲突问题。
因为每个组件中的样式,都有添加了唯一的属性选择器,从而保证了当前组件的样式只会影响自身的元素。
其实 Vue 为了简化用户的编码复杂度,为 <style> 提供了 scoped 选项。Vue 在编译 SFC 模板的时候,如果发现 <style scoped> 的写法,就会自动给当前组件生成一个唯一的 data-v-* 属性选择器,并自动把属性选择器添加到每个元素和每个CSS选择器上。
3. 根元素与 scoped
在 Vue3 中的 SFC 组件内,<template> 区域允许存在多个根元素,同时,也支持 Vue2 中的唯一根元素的写法。当父子组件同时应用 scoped 时:
- 如果子组件的
<template>中存在多个根元素,不会把父组件的data-v-*添加给子组件的根元素。 - 如果子组件的
<template>中只有唯一的根元素,则会把父组件的data-v-*添加给子组件的根元素。
4. 深度选择器
当父组件开启了 <style> 标签的 scoped 选项之后,默认情况下,父组件中编写的样式无法影响到子组件,这完全符合防止组件之间样式冲突的需求。
但是,这也产生了一个负面的作用:在不改动子组件代码的情况下,父组件中无法微调子组件中的任何样式!
解决方案很简单,使用 :deep() 这个伪类,把子组件的选择器包裹起来即可,例如:
<!-- 样式 -->
<style scoped>
h1 {
  color: red;
}

/* 把子组件的选择器,使用 :deep() 包裹起来 */
:deep(p) {
  color: green;
}
</style>
最终生成的样式如下:
[data-v-7a7a37b1] p {
    color: green;
}
5. CSS 中的 v-bind
SFC 中的 <style> 标签支持使用 v-bind() 这个 CSS 函数将响应式数据绑定为 CSS 属性的值。例如把响应式数据 count 绑定为 h1 元素的 font-size 值:
<!-- 结构 -->
<template>
  <!-- 点击按钮,让 count 数值自增 +1 -->
  <button @click="count++">+1</button>
  <h1>这是 App 根组件中的标题</h1>
</template>

<!-- 行为 -->
<script setup>
import { ref, computed } from 'vue'

// 字体大小,初始值为数值 12,不带 px 单位
const count = ref(12)
// 计算属性:为字体大小添加 px 单位值
const fsize = computed(() => count.value + 'px')
</script>

<!-- 样式 -->
<style scoped>
h1 {
  color: red;
  /* 把 font-size 的值绑定为计算属性 fsize 的值 */
  font-size: v-bind(fsize);
}
</style>
6. 基于组合式 API 封装自己的 Hooks API
经过我们的分析,发现 2.3.5 小节中,为了保证功能的正常运行,我们只需要拿到 count 和 fsize 即可。其中:
- count 是一个响应式的 ref 数据,是一个 number 数字类型的值;当点击按钮时,需要让 count 值自增
- fsize 是一个计算属性,它依赖于 count 值的变化,计算的结果是得到一个带有
px单位的字符串;我们会把它绑定为元素的font-size属性值
因此,我们可以把 count 和 fsize 创建的过程,封装为自定义的 Hooks。过程如下:
在 src 目录下创建 hooks 文件夹,并在 hooks 文件夹下新建名为 index.js 的文件:
// 1. 导入需要的组合式 API 函数
import { ref, computed } from 'vue'

// 2. 向外导出一个名为 useXXX 的自定义 Hooks 函数,其中 n 为初始数据
export const useSizePx = (n) => {
  // 2.1 定义响应式数据
  const size = ref(n)
  // 2.2 定义依赖于 size 的 computed 计算属性
  const sizePx = computed(() => size.value + 'px')

  // 3. 以数组的形式,向外暴露 size 和 sizePx 两份数据,供用户使用
  return [size, sizePx]
}
在 App.vue 中导入自定义的 Hooks 函数,传入初始值,并使用数组的解构操作,得到 Hooks 返回的 ref 数据和 computed 计算属性:
<!-- 结构 -->
<template>
  <button @click="count++">+1</button>
  <h1>这是 App 根组件中的标题</h1>
</template>

<!-- 行为 -->
<script setup>
import { useSizePx } from './hooks/index.js'
const [count, fsize] = useSizePx(12)
</script>

<!-- 样式 -->
<style scoped>
h1 {
  color: red;
  font-size: v-bind(fsize);
}
</style>
自定义 Hooks 的好处是:实现了业务代码的封装和复用。
7. 启用 less 语法
在 SFC 中编写样式时,如果想要使用 less 语法编写 CSS 样式,需要按照以下两个步骤进行配置:
步骤1:运行以下的 npm 命令,安装 less 依赖包:
npm install less -D步骤2:为 <style> 标签添加 lang="less" 属性:
<style lang="less" scoped>
h1 {
  color: red;
  font-size: v-bind(fsize);

  span {
    color: cyan;
  }
}
</style>
然后,就可以愉快的使用 less 语法啦~
2.4 组件注册
1. 全局注册组件
我们可以使用 Vue 应用实例的 app.component() 方法,让组件在当前 Vue 应用中全局可用,语法如下:
app.component('注册名称', 要注册的组件)例如:
import Counter from './components/Counter.vue'
// 使用 app.component() 函数注册全局组件
app.component('ButtonCounter', Counter)
注册好的组件,可以在任何组件中被使用:
<ButtonCounter></ButtonCounter>2. 局部注册组件
在选项式 API 中,需要按照以下3个步骤注册局部组件(私有组件):
- 导入需要使用的组件
- 在
components选项下注册导入的组件 - 以标签的形式使用注册好的组件
例如下面的代码,就使用了选项式 API 注册了 ButtonCounter 子组件:
<template>
  <!-- 3. 使用 -->
  <ButtonCounter></ButtonCounter>
</template>

<script>
// 1. 导入
import ButtonCounter from './components/ButtonCounter.vue'

export default {
  // 2. 注册
  components: {
    ButtonCounter
  }
}
</script>
在 script setup 中,免去了注册组件的步骤,因为顶层变量可以直接在模板中使用:
<template>
  <!-- 2. 使用 -->
  <ButtonCounter></ButtonCounter>
</template>

<script setup>
// 1. 导入
import ButtonCounter from './components/ButtonCounter.vue'
</script>
注意:在父组件中局部注册的子组件,只能在父组件中使用!
3. 组件名格式
无论是全局注册还是局部注册组件,都需要提供组件的注册名称。Vue 官方推荐使用 PascalCase(大驼峰) 格式的注册名称。
因为 PascalCase 格式的名称能很好的把 HTML 标签和自定义组件区分开来。
例如 <ButtonCounter></ButtonCounter> 就是使用了 PascalCase 格式的组件名称。
不过呢,以 PascalCase 格式注册或导入的组件,也能基于 kebab-case 格式的标签进行使用,例如 <button-counter></button-counter>。
注意:推荐大家今后在导入组件、注册组件、使用组件时都统一使用大驼峰的方式。
2.5 动态组件 & KeepAlive
当我们需要在同一个位置切换展示不同的组件时,可以使用动态组件来实现此功能。
1. component 元素和 is 属性
component 元素是一个组件的占位符,具体在 component 元素所在的位置展示哪个组件,由 is 属性决定。
is 属性的值可以是:
- 被注册的组件名
- 导入的组件对象
例如,定义 ComLight.vue 组件:
<template>
  <div class="box"></div>
</template>

<style scoped>
.box {
  width: 500px;
  height: 300px;
  background-color: #efefef;
  box-shadow: 1px 1px 10px #ccc;
  border-radius: 10px;
  padding: 10px;
}
</style>
再定义 ComDark.vue 组件:
<template>
  <div class="box"></div>
</template>

<style scoped>
.box {
  width: 500px;
  height: 300px;
  background-color: #2b2b2b;
  box-shadow: 1px 1px 10px #888;
  border-radius: 10px;
  padding: 10px;
  color: white;
}
</style>
在 App.vue 中通过 v-if 指令实现组件的按需展示:
<template>
  <button @click="flag = false">Light</button>
  <button @click="flag = true">Dark</button>

  <hr />
  <ComLight v-if="!flag"></ComLight>
  <ComDark v-else></ComDark>
</template>

<script setup>
import { ref } from 'vue'
import ComLight from './components/ComLight.vue'
import ComDark from './components/ComDark.vue'

const flag = ref(false)
</script>
在 App.vue 中通过 :is 指定导入的组件对象,从而实现组件的按需展示:
<template>
  <button @click="flag = false">Light</button>
  <button @click="flag = true">Dark</button>

  <hr />
  <component :is="flag ? ComDark : ComLight"></component>
</template>

<script setup>
import { ref } from 'vue'
// ComLight 和 ComDark 是导入的组件对象
import ComLight from './components/ComLight.vue'
import ComDark from './components/ComDark.vue'

const flag = ref(false)
</script>
在 App.vue 中通过 :is 指定注册的组件名称,从而实现组件的按需展示:
<template>
  <button @click="flag = false">Light</button>
  <button @click="flag = true">Dark</button>

  <hr />
  <component :is="flag ? 'MyDark' : 'MyLight'"></component>
</template>

<script>
import ComLight from './components/ComLight.vue'
import ComDark from './components/ComDark.vue'

export default {
  data() {
    return {
      flag: false
    }
  },
  // MyLight 和 MyDark 是注册名称
  components: {
    MyLight: ComLight,
    MyDark: ComDark
  }
}
</script>
2. 使用 KeepAlive 保持组件的状态
<KeepAlive> 是一个内置组件,它的功能是在多个组件间动态切换时缓存被移除的组件实例。
在 ComLight.vue 组件中新增计数器功能:
<template>
  <div class="box">
    <h1>{{ count }}</h1>
    <button @click="count++">+1</button>
  </div>
</template>

<script setup>
import { ref } from 'vue'
const count = ref(0)
</script>

<style scoped>
.box {
  width: 500px;
  height: 300px;
  background-color: #efefef;
  box-shadow: 1px 1px 10px #ccc;
  border-radius: 10px;
  padding: 10px;
}
</style>
在 ComDark.vue 组件中新增文本框的双向数据绑定:
<template>
  <div class="box">
    <input type="text" v-model="msg" />
    <p>消息是:{{ msg }}</p>
  </div>
</template>

<script setup>
import { ref } from 'vue'
const msg = ref('')
</script>

<style scoped>
.box {
  width: 500px;
  height: 300px;
  background-color: #2b2b2b;
  box-shadow: 1px 1px 10px #888;
  border-radius: 10px;
  padding: 10px;
  color: white;
}
</style>
最后,在 App.vue 根组件中,使用 <KeepAlive> 组件把 <component :is> 的动态组件包裹起来,即可实现组件的缓存:
  <KeepAlive>
    <component :is="flag ? 'MyDark' : 'MyLight'"></component>
  </KeepAlive>
3. 缓存实例的生命周期
被 KeepAlive 的组件,会有两种状态:被缓存或被激活。如果程序员想监听这两种状态的切换,并执行特定的操作,此时可以使用 onActivated(fn) 和 onDeactivated(fn) 这两个组合式 API 进行监听。
onDeactivated(fn) 会为当前组件注册一个被缓存时的回调,当组件从被激活的状态切换至被缓存的状态时,或被卸载时,会触发这个回调的执行。
onActivated(fn) 会为当前组件注册一个被激活时的回调,当组件首次被创建时,或组件从被缓存的状态切换至被激活的状态时,会触发这个回调的执行。
例如,在 ComDark.vue 组件被激活时,让文本框自动获取光标的焦点:
<template>
  <div class="box">
    <!-- 为文本框添加 ref 引用 -->
    <input type="text" v-model="msg" ref="iptRef" />
    <p>消息是:{{ msg }}</p>
  </div>
</template>

<script setup>
// 按需导入 onActivated 和 onDeactivated 两个组合式 API
import { ref, onActivated, onDeactivated } from 'vue'
const msg = ref('')
// 获取页面上 DOM 元素的引用
const iptRef = ref(null)

// 监听组件被创建和被激活的生命周期事件
onActivated(() => {
  console.log('Dark 组件被激活了!')
  // 让文本框自动获取光标焦点
  iptRef.value.focus()
})

// 监听组件被缓存和被卸载的生命周期事件
onDeactivated(() => {
  console.log('Dark 组件被缓存起来了!')
})
</script>

<style scoped>
.box {
  width: 500px;
  height: 300px;
  background-color: #2b2b2b;
  box-shadow: 1px 1px 10px #888;
  border-radius: 10px;
  padding: 10px;
  color: white;
}
</style>
注意:只能在被 KeepAlive 的组件上使用 onActivated 和 onDeactivated 这两个 API。
4. 最大缓存实例数
我们可以通过传入 max prop 来限制可被缓存的最大组件实例数。<KeepAlive> 的行为在指定了 max 后类似一个 LRU 缓存:如果缓存的实例数量即将超过指定的那个最大数量,则最久没有被访问的缓存实例将被销毁,以便为新的实例腾出空间。
<template>
  <button @click="comName = 'MyLight'">Light</button>
  <button @click="comName = 'MyDark'">Dark</button>
  <button @click="comName = 'MyCyan'">Cyan</button>

  <hr />

  <KeepAlive :max="2">
    <component :is="comName"></component>
  </KeepAlive>
</template>
5. 包含 Or 排除
<KeepAlive> 默认会缓存内部的所有组件实例,但我们可以通过 include 和 exclude prop 来定制该行为。其中:
- include 表示指定哪些组件需要被缓存
- exclude 表示指定哪些组件不需要被缓存
这两个 prop 的值都可以是一个以英文逗号分隔的字符串、一个正则表达式,或是包含这两种类型的一个数组。
在指定 include 或 exclude 的值时,KeepAlive 会根据组件的 name 名称进行匹配。因此:
- 在 3.2.34 以下的版本中,必须为组件显式声明一个
name选项 - 在 3.2.34 或以上的版本中,使用
<script setup>的 SFC 会自动根据文件名生成对应的name选项,无需再手动声明
字符串类型的 include 值:
<!-- 使用英文的逗号,分割多个组件的 name -->
<!-- include 表示这些组件需要被缓存,未包含在 include 中的组件将不会被缓存哦 -->
<KeepAlive include="ComLight,ComDark">
  <component :is="comName"></component>
</KeepAlive>字符串类型的 exclude 值(如果需要被缓存的组件很多,但是不需要被缓存的组件较少,此时可以使用 exclude 提高编码效率):
<!-- 使用英文的逗号,分割多个组件的 name -->
<!-- exclude 表示这些组件不需要被缓存,未包含在 include 中的组件将会被缓存哦 -->
<KeepAlive exclude="ComCyan">
  <component :is="comName"></component>
</KeepAlive>正则类型的 include 值:
<!-- 必须把 include 改为 v-bind 的形式 -->
<!-- 值为 /正则匹配/ 的格式 -->
<KeepAlive :include="/Com(Light|Dark)/">
  <component :is="comName"></component>
</KeepAlive>正则类型的 exclude 值:
<!-- 必须把 exclude 改为 v-bind 的形式 -->
<!-- 值为 /正则匹配/ 的格式 -->
<KeepAlive :exclude="/.*Cyan/">
  <component :is="comName"></component>
</KeepAlive>数组类型的 include 值:
<!-- 必须把 include 改为 v-bind 的形式 -->
<!-- 绑定的值为数组,数组中的元素项可以是字符串或正则 -->
<KeepAlive :include="['ComLight', /.*Dark/]">
  <component :is="comName"></component>
</KeepAlive>数组类型的 exclude 值:
<!-- 必须把 exclude 改为 v-bind 的形式 -->
<!-- 绑定的值为数组,数组中的元素项可以是字符串或正则 -->
<KeepAlive :exclude="['ComLight', /.*Dark/]">
  <component :is="comName"></component>
</KeepAlive>
6. 动态添加或移除被缓存的组件
整体思路分析:先实现组件的按需切换功能,再实现动态添加或移除被缓存的组件。
-
在
App.vue中,导入需要用到的3个组件:// 导入需要的组件 import ComLight from './components/ComLight.vue' import ComDark from './components/ComDark.vue' import ComCyan from './components/ComCyan.vue' -
声明动态展示的组件列表,并使用索引来控制当前展示的组件:
import { ref } from 'vue' // 动态组件列表 const coms = [ComLight, ComDark, ComCyan] // 要展示的组件索引 const index = ref(0) -
在模板中,使用
component元素展示动态组件:<component :is="coms[index]"></component> -
点击不同的按钮,切换 index 的值,从而展示对应的组件:
<button @click="index = 0">Light</button>
<button @click="index = 1">Dark</button>
<button @click="index = 2">Cyan</button>
至此,组件的按需展示功能就已经实现啦。接下来,要着手实现动态添加和移除被缓存的组件。
-
首先,定义一个被缓存的组件名称的数组,它是一个响应式的数据:
// 被缓存的组件名称的数组 const cacheNames = ref(['ComLight']) -
其次,在模板结构中用
KeepAlive组件把component元素包裹起来,并使用:include="cacheNames"指定要缓存的组件:<KeepAlive :include="cacheNames"> <component :is="coms[index]"></component> </KeepAlive> -
接下来,定义把组件加入缓存和移除缓存的两个方法,它们都接收一个组件的 name 名称作为参数:
// 添加新的组件缓存 const addCache = (name) => { if (cacheNames.value.includes(name)) return cacheNames.value.push(name) } // 移除已存在的缓存 const removeCache = (name) => { if (!cacheNames.value.includes(name)) return cacheNames.value = cacheNames.value.filter((item) => item !== name) } -
最后,在模板结构中新增3个按钮,用来把组件加入缓存或移除缓存:
<button @click="addCache('ComDark')">缓存ComDark</button>
<button @click="addCache('ComCyan')">缓存ComCyan</button>
<button @click="removeCache('ComLight')">不缓存ComLight</button>
版权归作者 ©刘龙宾 所有,本文章未经作者允许,禁止私自转载!